Morrigan Cosplay Necklace Tutorial
Welcome to my Morrigan cosplay necklace tutorial. Morrigan’s necklace is a really important piece because it is what most people recognize. I decided to put a little extra time and care into her necklace for this reason.
Materials:
- Wonderflex
- Plain Paper
- 1 Sheet of white craft foam (thin)
- White and Emerald Green Sculpey Clay
- 4 Tooth shaped beads 1” long
- 4 round beads with beveled edge ¾”
- Jewelry wire (on the thinner side)
- White beads
- Bronze Chain, rings and clasp
- Heat gun
- Whole Punch
- Craft Knife
- Super Glue (in gel form)
- Jewelry pliers
- Scissors
- Gold and Bronze Acrylic Paint
- Paint Brushes (for large areas and fine details)
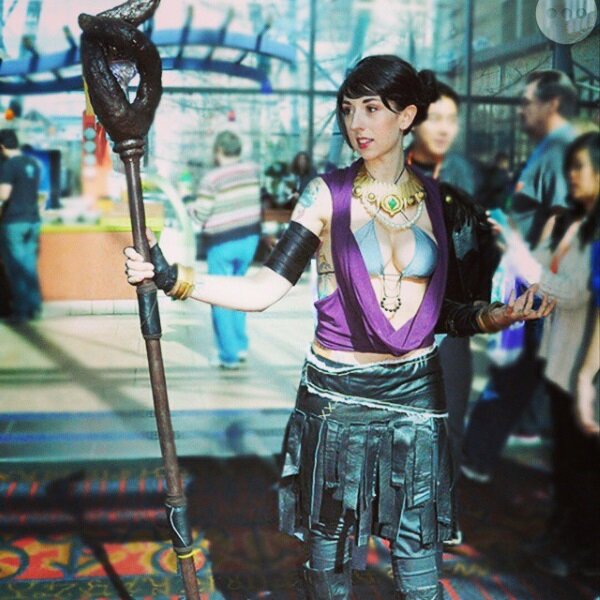
- Really good reference photos (I have included mine)

One of two reference photos I used.

My other reference photo
I started by measuring around my neck. Next I got a large piece of paper and using my measurements started to sketch out what I wanted the base of the necklace to look like. For comfort reasons I made the decision to not have the necklace go all the way around (I will explain later how I accomplished this). It took a couple of sketches before I got it exactly right. I cut this one out and put it on like I would the necklace. I then made a few notes with it on my neck where I needed to make adjustments. After this I had the pattern for the base.
I decided to use Wonderflex for the base for two reasons: 1.) I happened to have a large roll of it on hand and 2.) It is a very sturdy yet flexible material. I would definitely recommend using either Wonderflex or something similar. I used the pattern I had made to cut out the piece of Wonderflex. With it cut out I tried it on to make sure it was correct. I then warmed the Wonderflex slightly with a heat gun so that I could shape it to lay nicely on my chest and shoulders.
Next up was the little bar details on the body of the necklace. For this I used the thinner sheets of white foam you can pick up at any craft store. I first measured the entire length around the widest part of the wonderflex base that I just made. I then decided how thick I wanted the bars to be and how thick I wanted the gaps to be. I thought that ¼” bars and gaps looked best so I divided my measurement by ½” and that gave me the number of bars that I needed to cut out. Next I needed to know how long to make the bars so again I measured the base to get this number.
I wanted the bars to stick up from the top a little bit so I made sure to include that in my measurement. Now I was able to measure and mark out the bars on the foam sheet. Cutting them out was a bit tedious but I wanted to make sure that they were cut nice and straight.
After cutting out all of the bars it was time to line them up on the base and decide how to lay them out with the curve. Once they were all laid out and spaced as evenly as I could manage I started super gluing them on.
While those were drying I started sculpting the medallion in the middle. I started with the center green part. I worked the Emerald clay until it was pliable; rolled it to the thickness I desired ¼” or so. I have a few sculpting tools from cake decorating so I just use those. You can really use anything around your kitchen that might aid you in sculpting.
I had a large reference photo printed and used this as I attempted to create something halfway decent. It needs to be stated that I am not artist. My clay sculpting skills are quite terrible. Hopefully you can do a much better job than me. I have learned this part takes patience that I just don’t have. Anyway, I digress…After the Emerald middle piece is finished start on the outer part of the medallion. I used white because it would be easier to paint. First I again worked the clay until it was pliable and then rolled it to the same thickness as the middle piece. Using the same reference photo I got to work. Before I made the center all pretty I cut out a section the same size as the Emerald piece I had made so that it could be slid in. It is important to make this a very tight fit so that your Emerald piece doesn’t fall out. Once both pieces were finished I put the Emerald in the middle and baked the clay for the recommended amount of time.
While the clay was baking and drying I got started on the painting. I had several shades of gold and bronze that I just kept mixing until I liked what I saw. It was important to keep in mind that there is a base color but you want to be able to add darker and lighter shades when you dry brush to create depth and aging. With my nice base shade I went ahead and put several coats on the Wonderflex with a wider brush. I painted front and back making sure to get in all the little crevices. I also painted my round beads and the tooth shaped beads with the same color.
When the clay had cooled I very carefully applied the same color to the white part of the medallion being very careful to avoid the Emerald in the center. Once everything had a solid base coat with no flashing (paint term for anything underneath showing through anywhere) I started mixing my highlights and lowlights using my base color as a starting point. With a smaller paint brush I did the sides of the bars on the base with the darker color to add depth. I also dry brushed with a large old paint brush everything (minus the medallion) with first the highlight color and then with the lowlight. I took a much smaller old paint brush and very carefully did the same to the medallion.
When all the paint was dry I went ahead and placed all of the beads and medallion onto the base necklace to decide exactly where they would be glued. When I had it right I went ahead and glued each piece on. For this step I was incredibly liberal with the super glue. I gobbed it on, it took 2 days to dry fully. My beads and medallion were on the heavier side and I didn’t want to risk them falling off ever.
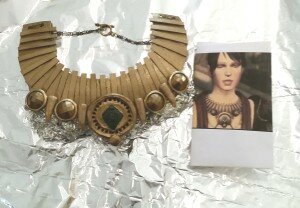
The balled up tin foil under the necklace is to help take the pressure off while drying,
Once the glue was dry I set to work on the chain and clasps so that I could actually wear the necklace. I went with a vintage looking bronze chain that felt cohesive with the rest of the necklace. I punched two holes on each end of the necklace base (it took a whole punch to mark the circles and a craft knife to cut them out).
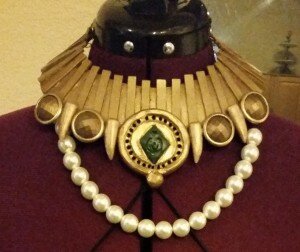
I put the necklace on and attempted to measure how long I wanted the chain to be. As you can see from the photos I threaded the chain through both wholes to help distribute the weight and prevent warping. I then attached a loop to the both ends to the chain on each side to bring them together and then attached the clasps to the two loops. I preferred to have a chain a clasp for easy on/easy off. I will say this did in fact make the necklace much easier to wear.
The final step was the white beads that hang from the necklace. For this step it took me a very long time to find the right white beads, but I love the ones I found. They were the right proportion and they weren’t too shiny. I used some jewelry wire and strung the beads onto, I made sure there was a lot of excess wire. Then I put on the necklace and the bikini top to try and figure out how long I wanted it to be.
With the necklace still on I went ahead and used the farthest hole on the necklace base to string the wire through until the beads were in the right spot. I continued to wrap the wire around and back through the hole several times until I was certain it was never coming undone. I cut off the excess wire and pinched it to necklace base with the jewelry pliers so that it wouldn’t poke me later.
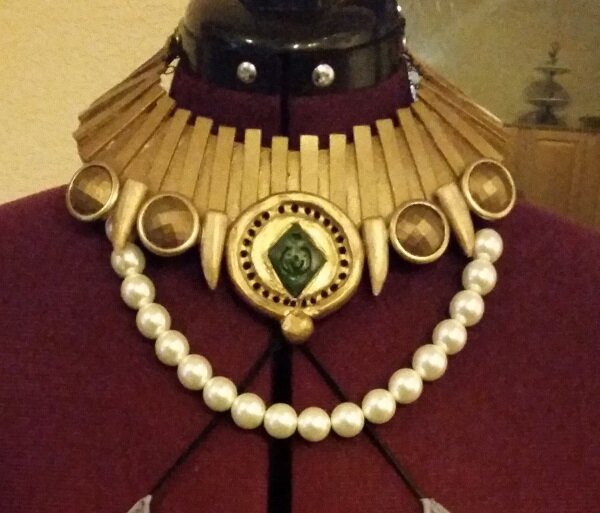
Here is the finished product
And that my friend is how I made Morrigan’s necklace. You may say “whew Jen that was a super long tutorial”. I have found when I am looking online for tips on how to make things the more information the better. You may not need all of it, but it is there just in case you do! I am happy to answer any questions you might have. Don’t hesitate to ask!!! I will be writing up more tutorials on the rest of Morrigan’s outfit (see below).
Thanks again for checking out my Morrigan cosplay necklace tutorial and Happy Crafting!!!
Latest posts by Jen (see all)
- 2013 Tomb Raider Cosplay Tutorial Tank Tops Part 2 - June 5, 2015
- 2013 Tomb Raider Cosplay Tutorial Tank Tops Part 1: - June 4, 2015
- 2013 Tomb Raider Cosplay Tutorial Pants Part 2: - June 1, 2015