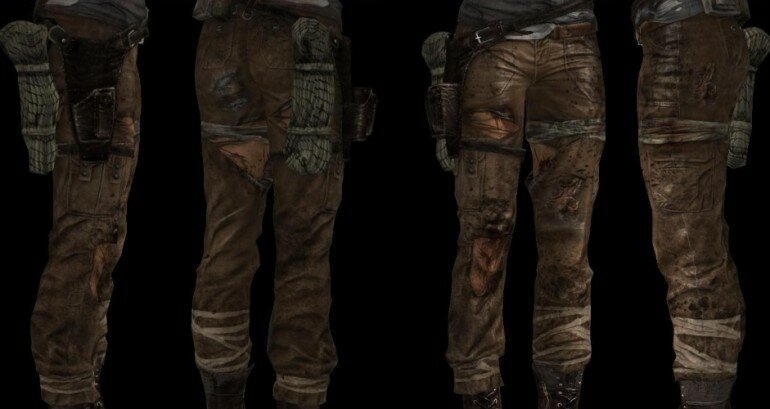
2013 Tomb Raider Cosplay Tutorial Pants Part 2:
First of all I have to give credit laracroftcosplay.com, an amazing site where I got most of my concept images from. They have a wealth of information, and I am simply adding to what they have. I will also be inserting the images I found most useful. Side note, a lot of these materials will be reused throughout all of Lara’s outfit so don’t be afraid of over buying; you will probably end up needing to buy more (especially the paint).
Materials:
- Pants from part 1
- Sandpaper: 1 rough & 1 fine (the grit doesn’t matter too much)
- 3 different shades of brown acrylic paint
- Black acrylic paint
- Medium size paint brush
- 2 shades red acrylic paint (to make blood)
- Wet coffee grounds
- 1 yard white stretch jersey fabric
- Black spray paint
- Brown spray paint
 The last and most enjoyable step of the 2013 Tomb Raider cosplay tutorial pants part 2 was the painting. Basically you are trying to recreate all of the running through the mud and forest and jumping onto cliffs and fighting off wolves. The first step was to recreate a muddy substance with all 4 different colors of acrylic paint (3 browns and 1 black). Be very generous with the browns, and only add a small touch of black (like a drop). This mixture should be in a medium to large size bowl that you don’t care about very much. Once you have the paint in, you are going to want to add one part warm water to your one part paint. Give the paint and water a good mix with your paint brush until all the paint is mixed in with the water. If this mixture is runny you did it right. You want it to be the equivalent of a mud puddle.
The next step would be to find a spot outside that can get messy or lay down a tarp. Either way this should be done outside to get the full effect. I live in the desert so I didn’t bother with a tarp; part of my backyard is covered with brown rocks. I also have this really handy work table and bench that is there for the sole purpose of getting messy. If you don’t have one of these you can improvise (the motto of the cosplayer).
I laid the pants on the bench so that they were upside down and dangling off the edge, down to the ground. Then I dipped the brush in the paint to get it good and wet and started splashing paint onto the pants to mimic how the mud would splash up. The bottom of the pants ended up pretty much soaked. I tried to make the paint splashes really heavy at the bottom and lighter up towards the top. When I was running low on my water paint solution I decided to add a little more water, mix it up and starting at the bottom of each leg, I poured the water/paint down the pant legs to give it a good soak. I then allowed them to bake in the desert sun for the rest of the day to help them fade a bit.
You can repeat the water/paint mud process as many times as you would like until the pants are muddy enough for you. I repeated the process 3 times to achieve the look you see here:
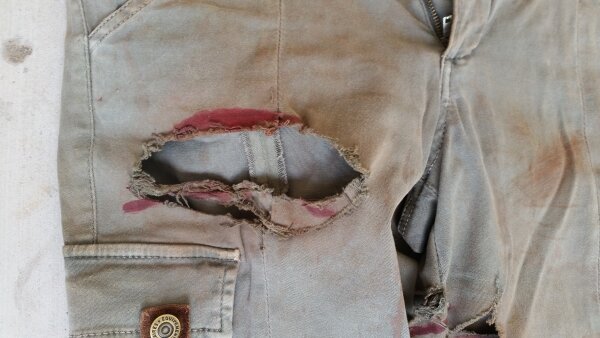
Next comes the bloody details. First step was to make the blood. I used 2 different shades of red acrylic paint (both a little on the darker side to mimic dried blood). I combined both shades in a bowl and again I watered it down a bit so it wouldn’t look quite so much like paint. Using a smaller paint brush I applied the blood to some of the edges of the tares as well as creating some splatters on the pants. You can see my blood details in this photo:
Now we can hit the final weathering details. I used wet coffee grounds and really rubbed them into the pants in areas that I thought made sense. The coffee grounds mimic dirt and make it look like Lara might have fallen into the dirt or rubbed up against something dirty. I was very liberal with these as I was going for a very dirty and beat up Lara. I especially rubbed them on the pockets, belt loops, most of the seams, and around the rips. I also gave a few spots one last go with the sand paper. It helps to put them on and take a few pictures to really see if you missed any spots.

My Lara Croft from PAX 2014
The last detail of our 2013 Tomb Raider cosplay tutorial pants part 2 are the white strips of fabric wrapped around Lara’s lower legs. I cut the white jersey strips long ways into 1/2″ to 2″ thick pieces until I had used all but 6″ of the fabric. These will be used several times throughout Lara’s outfit, not just on her legs. Using the 1/2″ thick strips I grabbed a couple and tried them on until I had the right look. I used just one strip on the right leg and two on the left leg. For the upper thigh on the left leg I used one of the 2″ strips. To weather them I used the wet coffee grounds and the black and brown spray paint. If you are going to complete the rest of Lara’s outfit you may as well do this to all of the strips so you only have to do it once. First rub them with the coffee grounds. Them apply a very light misting of the brown and black spray paint. The pic above should be your final look.
If you missed the the my first post, here’s the 2013 Tomb Raider Cosplay Tutorial pants part 1.
Latest posts by Jen (see all)
- 2013 Tomb Raider Cosplay Tutorial Tank Tops Part 2 - June 5, 2015
- 2013 Tomb Raider Cosplay Tutorial Tank Tops Part 1: - June 4, 2015
- 2013 Tomb Raider Cosplay Tutorial Pants Part 2: - June 1, 2015