2013 Tomb Raider Cosplay Tutorial Pants Part 1:
First of all I have to give credit to this amazing website (Laracroftcosplay.com) where I got most of my concept images from. They have a wealth of information, and I am simply adding to what they have. I will also be inserting the images I found most useful throughout as well as any helpful links at the bottom. Side note, a lot of these materials will be reused throughout Lara’s entire outfit so don’t be afraid of over buying. You will not need any of the paint until part 2, but I put it on this list in case you like to have everything prepped before you begin (I know I do).
Materials:
- Army Green Pants (I found mine on ebay)
- There is some debate over green or brown pants. I opted for green because it made more sense for the terrain of the game.
- Box cutter
- Pencil
- Sandpaper: 1 rough & 1 fine (the grit doesn’t matter too much)
- 3 different shades of brown acrylic paint
- Black acrylic paint
- Medium size paint brush
- 2 shades red acrylic paint (to make blood)
- 2 ½ wide strips of brown suede
- 8 dungaree buttons (that is what they are called at Joann Fabrics)
- 1 Yard of plain white jersey fabric
- Black spray paint
- Brown spray paint
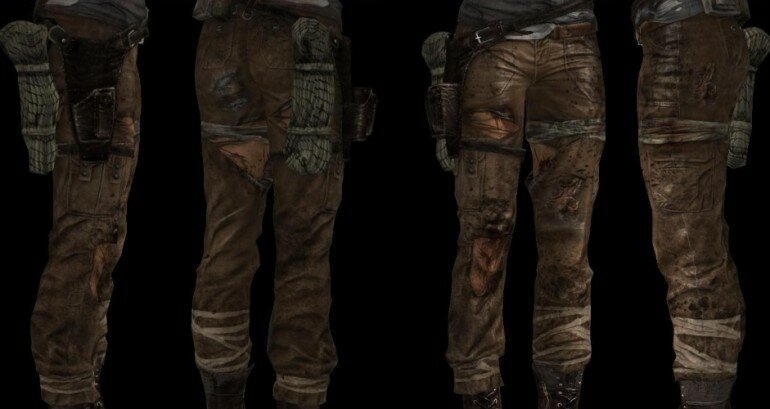
 For this 2013 Tomb Raider cosplay tutorial pants part 1 I began with trying the pants on in front of a mirror. Using the featured pic above as a guide, I used a pencil to mark the areas of the pants that needed to be torn. I wanted the tears to look like they had really happened, so I really tried to think about how they tore and what that should look like. I wanted my Lara to be even more realistic than in game Lara. Once it is marked and you have them off, get out your box cutter and start making some cuts. I stick to the tried and true rule that you can always cut off more but you can’t put more back on. I made slices in the middle of my markings and did some hand tearing to make it more realistic. You can also use some scissors if the box cutter is difficult to use. The scissors you have to be careful or it will look too neat. I tried to leave some tatters in the middle of my holes which took some very delicate cutting and tearing. All I can say is go slow, take your time, and try them back on often to decide if you need to tear more. Here are how my tears and rips ended up looking:
Next up was weathering. I wanted to weather before adding any other details. Once you get too far in you risk undoing some of your hard work. I started with a sanding block and some rough sandpaper (really anything square will work as a sanding block). I started at the waist band and just worked my way down. For the rough grit I picked areas that would naturally get much more worn than the rest of the pants like the belt loops, around the pockets and tares. When I was satisfied with the heavy weathering I took the fine grit and went over pretty much the rest of the pants. By the time I was done the pants looked very well worn.

These pants were brand new when I started.
After weathering I just made a list of all the little details and started addressing each of them one at a time. First up was the dungaree buttons on the back of the pants. The pants I found on ebay did not come with buttons so I had to add them which was very easy. First I sanded the buttons so they would match the worn look of the rest of the pants. And then I just followed the instructions on the packaging to attach them.

The button detail that I added.
One thing you will hear repeated throughout this and the rest of my 2013 Tomb Raider cosplay tutorials pants part 1 is “first I weathered” and by weathering I mean sand to the point of looking worn. Lara Croft goes through a lot on the island and all of her stuff gets pretty good and worn out by the end.
The next detail is the suede straps and buttons on her right cargo pocket. I had one large strip of suede that I cut into two ½” wide and 2” long strips. I also got out 4 of the dungaree buttons. Before doing any attaching I weathered both the strips and the buttons. Using my reference photo I estimated about where the strips should go and attached them with the buttons.

Please stay tuned for 2013 Tomb Raider Cosplay Tutorial Pants Part 2 for the painting and finishing touches.
http://laracroftcosplay.com/HelpWithOutfits/cargopants.html (this is the tutorial I watched before starting to make Lara’s pants)
http://laracroftcosplay.com/HelpWithOutfits/howtomake.html#codeword1 (this is the link to the website that has a wealth of tutorials and reference photos)
Latest posts by Jen (see all)
- 2013 Tomb Raider Cosplay Tutorial Tank Tops Part 2 - June 5, 2015
- 2013 Tomb Raider Cosplay Tutorial Tank Tops Part 1: - June 4, 2015
- 2013 Tomb Raider Cosplay Tutorial Pants Part 2: - June 1, 2015
Pingback: 2013 Tomb Raider Cosplay Tutorial Pants part 2 | Nerd Farm